
Quite a few of our customers use a SharePoint Designer workflow to automatically create PDF files whenever a document is created or modified in a SharePoint Document Library. Some of these customers want to use the same directory structure for the source files as well as the converted files.
The problem that we’ll address in this posting is how to automatically synchronise the two directory structures using the Muhimbi Workflow Power Pack and a small script.
A quick introduction for those not familiar with the product: The Muhimbi Workflow Power Pack for SharePoint allows custom C# or VB.NET code to be embedded in SharePoint Designer Workflows without the need to resort to complex Visual Studio based workflows, the development of bespoke Workflow Activities or long development cycles.
The script we’ll develop is executed every time a file is created anywhere in a document library. The file’s path will be extracted and replicated in the destination Document Library. Ideally we would only like to trigger this workflow whenever a new folder is created, but using SharePoint designer it is not possible to trigger workflows for folders.
At the end of the custom activity the destination path is returned to the workflow, from where it can be used for further processing.
Create the workflow as follows:
Download and install the Muhimbi Workflow Power Pack for SharePoint.
Make sure you have the appropriate privileges to create workflows on a site collection.
Create a source and destination Document Library. Alternatively use the same Document Library for the source and the destination, just create a new folder in the root to mirror the folder structure to.
Create a new workflow using SharePoint Designer.
On the Workflow definition screen associate the workflow with the Source Document Library and tick the box next to “Automatically start this workflow when a new item is created” and proceed to the next screen.
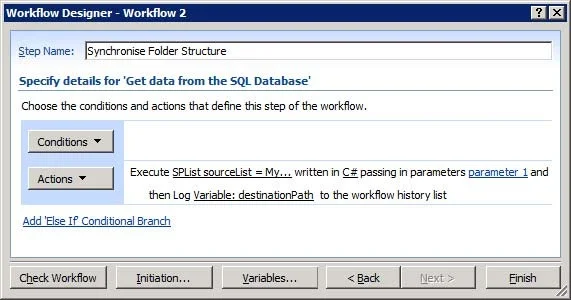
Click the Actions button and insert the Execute Custom Code action .
Click this variable and create a new Workflow Variable named destinationPath using string as the type.
Insert the following C# based code by clicking this code.
Update the destinationList and rootFolderName variables to match your situation.
Click the Actions button, select Log to History List, click this message, set the Source to Workflow Data and the Field to destinationPath.
Close the Workflow Designer and add an item somewhere in a nested folder in the source Document Library to trigger the workflow.
Once the workflow has finished, click the Completed link to see which path the new folder has been created in. Check that the destination folder(s) have been created by navigating to the Destination Library.
In case you want to use this in combination with Muhimbi’s PDF Converter for SharePoint then you can use the path returned in the destinationPath variable and use it as the destination URL in the Convert To PDF workflow activity. If you want to use it in combination with something else, then use it as you see fit.
Note that a small change may be required to the script, or perhaps as a Custom Code Condition, if the source and destination Document Libraries are the same and files will be written to the location specified in rootFolderName. Otherwise the folder structure inside the destination folder will be mirrored in the destination folder, just at a deeper level.
Labels: Articles, News, PDF Converter, Workflow