

One of the most common (sub) tasks executed from a SharePoint workflow is the submission of an email. SharePoint ships with an Email Workflow Action out of the box, which is unfortunately very limited in its abilities. For example, it is not possible to include attachments, specify the From Address, set the Priority or specify the SMTP server to use.
In this blog post I’ll describe how to send an email from a workflow that automatically includes all files / attachments for the current item from a SharePoint Designer workflow using the Workflow Power Pack.
A quick introduction for those not familiar with the product: The Muhimbi Workflow Power Pack for SharePoint allows custom C# or VB.NET code to be embedded in SharePoint Designer Workflows without the need to resort to complex Visual Studio based workflows, the development of bespoke Workflow Activities or long development cycles.
Please note that this tutorial was originally written for SharePoint 2007. In newer versions of SharePoint please replace the ‘Build Dynamic String’ action with the ‘Set Workflow Variable’ action. Some familiarity with building basic workflows in SharePoint Designer and SharePoint programming in C# is required. Please see the Workflow Power Pack User Guide series for more details.
The solution presented below uses the standard Build Dynamic String Action to create the body of the email. This body is then passed as Parameter 1 to the Execute Custom Code Action. Parameter 2 is used to specify the To Address. This code is a great starting point for further customisation. For more details see the standard .net MailMessage and SmtpClient classes.
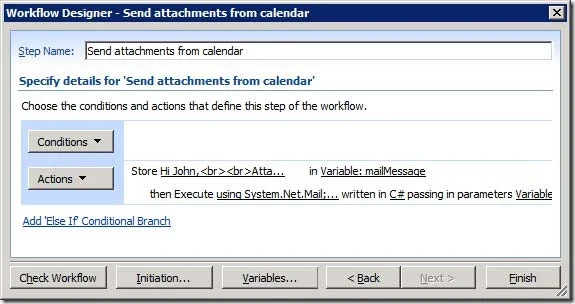
Create the workflow as follows:
Download and install the Muhimbi Workflow Power Pack for SharePoint.
Make sure you have the appropriate privileges to create workflows on a site collection.
Create a new workflow using SharePoint Designer.
On the Workflow definition screen associate the workflow with the list or library of your choice, tick the boxes next to both ‘ Automatically start…’ items and proceed to the next screen.
Click the Actions button and insert the Build Dynamic String action .
Click dynamic stringand enter an HTML based email.
Click variable1 and create a new string based variable named mailMessage.
Click the Actions button and insert the Execute Custom Code action .
Click parameter 1, open the Workflow Lookup dialog and select Source: Workflow Data, Field: mailMessage.
Click parameter 2 end enter the address to send the email to. Naturally this could be a lookup value as well.
Insert the following C# based code by clicking this code.
Close the Workflow Designer and add an item to your list or library to trigger the workflow.
The code in this example is a great starting point for making further customisations. You may want to change which parameters are passed in or load the attachments from a different item (See this Knowledge Base Article) or even using an HTTP Request. The solution presented in this post also works very well when combined with one of our other postings: Automatically convert files to PDF using an e-mail enabled SharePoint Document Library
Labels: Articles, News, PDF Converter, Workflow