

In part 2 of our series of User Guide related blog postings for the Muhimbi Workflow Power Pack for SharePoint we provide a number of examples of how to embed c# or vb code directly into a SharePoint Designer Workflow Condition.
A quick introduction In case you are not familiar with the product: The Muhimbi Workflow Power Pack for SharePoint allows custom C# or VB.NET code to be embedded in SharePoint Designer Workflows without the need to resort to complex Visual Studio based workflows, the development of bespoke Workflow Activities or long development cycles.
The following Blog postings are part of this User Guide series:
Language Features: Discusses the script like syntax, the generic workflow action and condition, passing parameters, returning values from a workflow and using the MyWorkflow property.
Embedding .net code in a Workflow Condition (this article): Provides a number of examples of how to use the Evaluate Custom Code condition to carry out basic as well as complex conditional tasks.
Embedding .net code in a Workflow Action: Contains a number of examples of how to use the Execute Custom Code to basically carry out any action you can think of in a SharePoint Designer Workflow.
Creating Custom Methods: Shows how to create your own methods in your scripts in order to keep the code organised and easy to maintain.
SharePoint ships with a number of Workflow Conditions to carry out basic comparisons inside your SharePoint Designer workflows. However, these Conditions are limited in scope and mainly facilitate simple comparisons of workflow variables.
This post describes how to use the Muhimbi Workflow Power Pack to write your own conditional logic in c# and embed it directly into your SharePoint Designer workflow.
Simple Example - File name validation
The following example shows how to check if a document’s file name contains a reference to a highly confidential project (Project Flames). If it does then the document will be renamed automatically.
To create this workflow, carry out the following steps:
Make sure you have access to a Document Library in a site collection and the appropriate privileges to design a workflow on that site collection.
Create a new workflow using SharePoint Designer.
On the Workflow definition screen associate the workflow with your Document Library, tick the two “automatically start” check boxes and proceed to the next screen.
Click the Conditions button and insert the Evaluate Custom Code condition.
Insert the following C# based code by clicking code and then the ellipsis (…) button.
Add the Execute Custom Code Action and insert the following code by clicking this code and pasting the following.
Close the workflow designer. This will automatically check the syntax of the code embedded in the Custom Action.
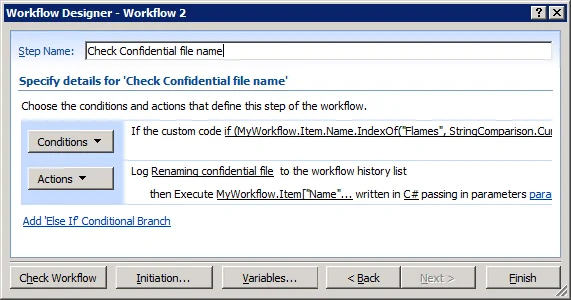
The workflow is now ready to be executed. Upload a file named “ Project Flames Hostile Takeover.docx” and watch it being renamed automatically.
In this simple example we could have merged the conditional code into the Action. However that would not work with more complex workflows where the Action does not necessarily contain our own custom code.
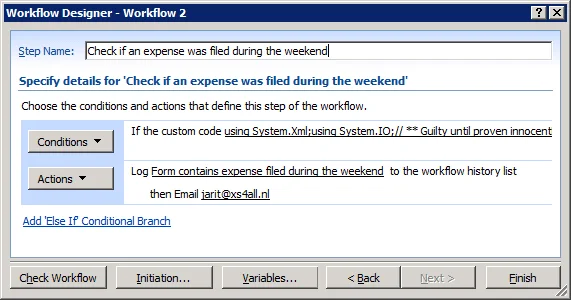
Complex example - Check field in InfoPath form
As we have access to the full power of the .net framework, there are very few limitations to how complex the conditional code can be. In the following example we will check the value of a field stored deeply in an XML Document generated by InfoPath. To be more specific, if any of the items in the Expense claim form were filed for a day in the weekend then we will send an email to John the Expenses Manager.
Naturally this conditional logic could have been added inside the validation of the InfoPath form itself. However, that would require access to Tom the InfoPath Expert and Tom is very busy and going on holiday tomorrow. In other words, we will need to be creative.
To create this workflow, carry out the following steps:
We need to be able to access functionality in the System.XML assembly. Add this reference to the relevant Web Application using the Workflow Power Pack Central Administration screens as described in the Administration guide.
Make sure you have the appropriate privileges to create Form Libraries and design workflows on a site collection.
Open InfoPath, select Customize a Sample followed by Sample - Expense Report.
Select Publish from the File menu, save the form anywhere on your local system and complete the wizard to publish it to a new Document Library named Expense Forms in your site collection. There is no need to expose any columns to SharePoint.
In the Expense Forms Document Library fill out the form, enter one expense in a weekend and make sure you save it to the Document Library. Don’t submit it as that will go via email.
Create a new workflow using SharePoint Designer.
On the Workflow definition screen associate the workflow with your new Expense Forms Document Library, tick the two “automatically start” check boxes and proceed to the next screen.
Click the Conditions button and insert the Evaluate Custom Code condition.
Insert the following C# based code by clicking code and then the ellipsis (…) button.
Click the Actions button and select the Send an Email activity and fill in the blanks to make it send an email to the relevant manager.
Close the Workflow Designer and re-save the previously saved Expense Form to trigger the workflow.
.