
Our PDF Converter for SharePoint is getting great reviews, but naturally we cannot please everyone, or at least not yet. One of the requests we get from time to time is to add support for the ability to specify PDF Security settings (Open Password, Owner Password, Block Print, Block Copy etc).
Update: It is now possible to apply PDF Security settings using a native SharePoint Designer workflow activity. It is no longer necessary to use the Workflow Power Pack approach outlined in this post, although it may still be useful for those users who want ultimate control and carry out the conversion and application of security in one go.
The thing is, our underlying engine and Web Service interface already support this functionality. However, the user interface and workflow action have not yet been updated. In this article we describe how to access this ‘hidden’ functionality from a workflow using the Workflow Power Pack.
A quick introduction for those not familiar with the product: The Muhimbi Workflow Power Pack for SharePoint allows custom C# or VB.NET code to be embedded in SharePoint Designer Workflows without the need to resort to complex Visual Studio based workflows, the development of bespoke Workflow Activities or long development cycles.
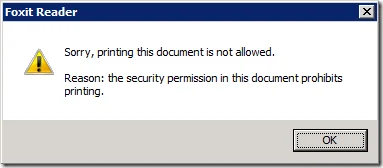
The solution presented below automatically converts any updated or newly created files to PDF format and applies the DisablePrint and DisableContentCopy security flags to the file. As the code is well documented it is easy to make further changes and customisations.
Create the workflow as follows:
Download and install the Muhimbi Workflow Power Pack for SharePoint.
Download and install the Muhimbi PDF Converter for SharePoint.
We need to be able to access functionality in the Muhimbi.SharePoint.DocumentConverter.PDF, System.ServiceModel and System.Runtime.Serialization assemblies. Add these references to the relevant Web Application using the Workflow Power Pack Central Administration screens as described in the Administration Guide. Make sure to place each reference on a new line.
Make sure you have the appropriate privileges to create workflows on a site collection.
Create a new workflow using SharePoint Designer.
On the Workflow definition screen associate the workflow with the library of your choice, tick the boxes next to both ‘ Automatically start….’ options and proceed to the next screen.
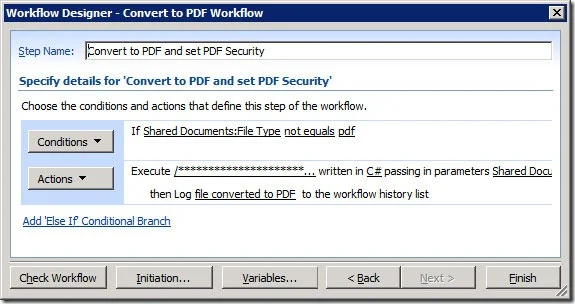
To prevent the code from acting on files that are already in PDF format, add a Compare Any Data Source condition and:
a. Click on the first value followed by the display data binding (fx) button.
b. Select Current Item as the Source and select File Type in the Field. Click the OK button to continue.
c. Click equals and change it to not equals.
d. Click on the second value and enter pdf.
Click the Actions button and insert the Execute Custom Code action .
Click parameter 1 and optionally enter a relative or absolute destination path (For details see this post and search for the words ‘this url’). Leave the parameter empty to write the PDF file to the same directory as the source file.
Download the source code or insert the C# based code listed below by clicking this code.
This code allows more control over the PDF Conversion process compared to what is possible
with the Out-Of-The-Box action, for example: PDF Security Options, Use of PDF/A, Quality,
Enable Macros and the ability to specify a password to open a source file.
This code requires Muhimbi’s PDF Converter and Workflow Power Pack to be installed.
For details about the Web Services interface see:
https://www.muhimbi.com/blog/converting-office-files-to-pdf-format-using-a-web-services-based-interface/
********************************************************************************************/
using Muhimbi.SharePoint.DocumentConverter.PDF;
using Muhimbi.SharePoint.DocumentConverter.PDF.WebServiceClient;
using System.Collections;
// ** Set all variables required for the conversion of the file.
SPFile sourceFile = MyWorkflow.Item.File;
// ** Specify an empty string or null to use the same directory as the source file.
// ** Alternatively specify an absolute or relative (to the web) path, e.g.
// ** subsite1/Shared Documents/PDF or /sites/HumanResources/subsite1/Shared Documents/PDF
string destinationFolderName = MyWorkflow.Parameter1 as string;
string destinationFileName = Utility.ExtractFileName(sourceFile.Name) + ".pdf";
string openPassword = "";
string ownerPassword = "A Nice And Strong Password!";
SecurityOptions securityOptions = SecurityOptions.DisablePrint |
SecurityOptions.DisableContentCopy;
bool copyMetadata = true;
// ** Get a reference to the PDF Converter web service.
DocumentConverterServiceClient client = WebServiceConverterHelper.OpenService();
//** Set the various open options
OpenOptions openOptions = new OpenOptions();
openOptions.Password = "";
openOptions.OriginalFileName = sourceFile.Name;
openOptions.FileExtension = Utility.ExtractFileExtension(sourceFile.Name);
openOptions.AllowMacros = MacroSecurityOption.None;
openOptions.RefreshContent = true;
//** Specify the various security settings
ConversionSettings conversionSettings = new ConversionSettings();
conversionSettings.Fidelity = ConversionFidelities.Full;
conversionSettings.Format = OutputFormat.PDF;
conversionSettings.Quality = ConversionQuality.OptimizeForPrint;
conversionSettings.Range = ConversionRange.VisibleDocuments;
conversionSettings.StartPage = 0;
conversionSettings.EndPage = 0;
conversionSettings.GenerateBookmarks = BookmarkGenerationOption.Automatic;
conversionSettings.PDFProfile = PDFProfile.PDF_1_5;
// ** Specify either an Open or Owner Password in order to activate the security Options
conversionSettings.OpenPassword = openPassword;
conversionSettings.OwnerPassword = ownerPassword;
conversionSettings.SecurityOptions = securityOptions;
// ** Read the content of the source file
byte[] sourceFileArray = sourceFile.OpenBinary();
// ** Carry out the actual conversion to PDF
byte[] convertedFile = client.Convert(sourceFileArray, openOptions, conversionSettings);
// ** Construct the path and file to write the PDF file to.
if (string.IsNullOrEmpty(destinationFolderName) == true)
destinationFolderName = sourceFile.ParentFolder.Url;
SPFolder destinationFolder = Utility.GetSPFolder(destinationFolderName, MyWorkflow.Web);
string destinationFilePath = string.Format("{0}/{1}", destinationFolder.Url,
destinationFileName);
SPWeb destinationWeb = destinationFolder.ParentWeb;
SPFile spDestinationFile = destinationWeb.GetFile(destinationFilePath);
// ** If a document library requires manual checkout and the file is not checked out, then
// ** check the file out before uploading.
if (spDestinationFile.Exists && spDestinationFile.Item.ParentList.ForceCheckout &&
spDestinationFile.CheckOutStatus == SPFile.SPCheckOutStatus.None)
{
spDestinationFile.CheckOut();
}
// ** Copy metadata, if requested.
if (copyMetadata == true &&
sourceFile.Name.EndsWith("x", StringComparison.InvariantCultureIgnoreCase) == false)
{
// ** Pre office 2007 formats (without the trailing x) are treated differently
// ** from the office 2007 formats when it comes to copying meta data.
Hashtable metadata = sourceFile.Item.Properties;
// ** Add the file to the site including the meta data
spDestinationFile = destinationWeb.Files.Add(destinationFilePath, convertedFile,
metadata, true);
}
else if (copyMetadata == true)
{
// ** Add the file to the site.
spDestinationFile = destinationWeb.Files.Add(destinationFilePath,
convertedFile, null, true);
// ** Copy the Actual meta data to the newly created file.
foreach (SPField field in sourceFile.Item.Fields)
{
if (field.ReadOnlyField == false && spDestinationFile.Item.Fields.ContainsField(field.InternalName) == true)
{
spDestinationFile.Item[field.InternalName] = sourceFile.Item[field.InternalName];
}
}
// ** Update the meta data
spDestinationFile.Item.Update();
}
else
{
// ** Actively strip all meta data
Hashtable metadata = new Hashtable(sourceFile.Item.Properties.Count);
foreach (Object key in sourceFile.Item.Properties.Keys)
{
metadata.Add(key, string.Empty);
}
// ** Add the file to the site with all meta data stripped
spDestinationFile = destinationWeb.Files.Add(destinationFilePath, convertedFile,
metadata, true);
}
// ** Check the file back in if this script was responsible for checking it out.
if (spDestinationFile.Item.ParentList.ForceCheckout == true)
{
spDestinationFile.CheckIn("Auto check-in after PDF Conversion");
}
Click the Actions button, select Log to History List, click this message and enter File converted to PDF.
Close the Workflow Designer and update or add an item to your library to trigger the workflow.
Naturally this is just a simple example. Feel free to play around with the code, change which parameters are passed into the workflow or modify where converted PDF files are written to.
Labels: Articles, PDF Converter,Workflow