

We all love filling out forms, especially those in Human Resources- making sure that every employee has the newest iteration of city/district/state withholding forms completed on time makes the day fly by. There are those however, who look at this as a waste of time- most of the information already exists in SharePoint, so why can’t the completion of these forms just be automated in a way that presents them in a format acceptable for submission?
The Muhimbi Converter for SharePoint has long had the ability to convert SharePoint list items (including those customized with InfoPath or Nintex Forms) as well as inserting list item data into a PDF document. This allows the list data, along with the look and feel of the form to be converted to PDF. The problem is, even with some tweaking, it also includes extraneous formatting and getting the sizing just right, so it appears exactly like a standard form, is very difficult or will not work properly if the source is already a PDF and so links to list data cannot be added to it.
So, what’s the solution..? Why not just use the actual form that needs filling out as a template and then simply watermark the required data into it? List item fields are stored in SharePoint and can be accessed using Muhimbi’s great XML watermarking format, so this is actually quite easy.
To keep this example simple, we’ll start out with a plain SharePoint list that contains a number of custom columns holding basic personal information:

We then place a PDF copy of the form to be filled out, in this case a U.S. W-9, in a library accessible to the workflow.

Our example uses a simple workflow that watermarks this PDF using our XML syntax that can pull in the list item data as the content for the watermark. There are a couple of things to note about this action. It does not run against the list item that started the workflow, but rather the source W-9 PDF that we are watermarking, so that document’s Source List ID and List Item is specified. As well, since we are adding the watermark content from the list item, we have copied that content to workflow variables so it’s referenced properly, no matter what item is being worked on.
The following screenshot shows our software being used in Nintex workflow, but it works equally well in SharePoint Designer workflows and Visual Studio workflows. A basic understanding of workflows is required, if needed you can learn about SharePoint Designer workflows here and Nintex workflows here.
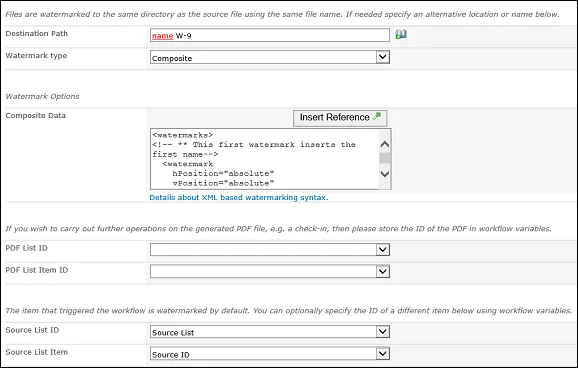
This sample XML places the first and last name of the user (as defined in the First and Last workflow variables) in the correct location:
The placement of the watermarks is specified using the specific coordinates of where the data needs to be placed. The coordinates are specified in Points (1/72nd of an inch). After running the workflow on the two items in the list, we get 2 separate PDFs with the custom information watermarked into them.
David Radford W-9.pdf

Bob Denver W-9.pdf

Once this is in place, it is very simple to just modify the watermarking action to move the data to different locations, allowing multiple different forms to be filled out in a single workflow. As well, when forms change slightly, all that needs to be done is change the coordinates of the fields that moved, and everything works again.
Labels: Articles, pdf, PDF Converter, Watermarking