From time to time our support desk is asked how to convert or move files to a different site collection in SharePoint Online / Office 365 in combination with our popular PDF Converter for SharePoint Online. Unfortunately the answer is always something along the lines of ‘ this is not possible using SharePoint Designer Workflows as there are clear security boundaries between site collections’.
Although there are some hacky and difficult ways to achieve this by directly invoking a REST based interface or using SharePoint’s Content Organizer, there is a different route that fits in well with the workflow mind-set, Microsoft’s cool new Flow product.
A detailed description of Flow is beyond the scope of this post, but let’s just say that it is the spiritual successor to SharePoint Designer, at least from a workflow perspective, with the key differentiator being that it is all modern and web-based, and – more importantly – not tied into SharePoint. It can integrate with many systems ( BaseCamp, DropBox, Onedrive, Dynamics CRM, SalesForce) SharePoint being just one of them.
Although our developers are working hard to directly integrate our existing SharePoint Online Workflow Actions with Microsoft Flow - basically creating Flow specific versions that can be used from any platform - for now the solution is to first create a SharePoint Designer workflow to convert a file to PDF, which in turn invokes Flow to move the file to the destination Site Collection.
Read on for details about how to achieve this. Naturally this same technique also works for copying ANY file between site collections, it doesn’t need to come out of our Converter. The same technique can be used to copy files to and from OneDrive, DropBox and any other supported system.
If not already done so, sign up for Microsoft Flow (Free).
If not already done so, in Flow navigate to My Connections and set up a SharePoint connection.
In SharePoint Online make sure you have access to two different site collections. In this example we have named them SourceSite and DestinationSite.
Determine the name of the source and destination Document Libraries and folders, in our example the source folder is the root of the TransferToOtherSite Document Library. The Destination folder is in the Shared Documents library, specifically the FromOtherSite folder.
In this example we first create a SharePoint Designer Workflow (on the Source Site) that converts a file to PDF and writes the resulting file to the TransferToOtherSite Document Library. Your scenario may be different, but a short video about how to create such a workflow can be found in our Knowledge Base.
With a process setup that automatically places files in the source location, it is time to create a new process in Flow. On the My Flows screen select the option to create a New flow from blank.
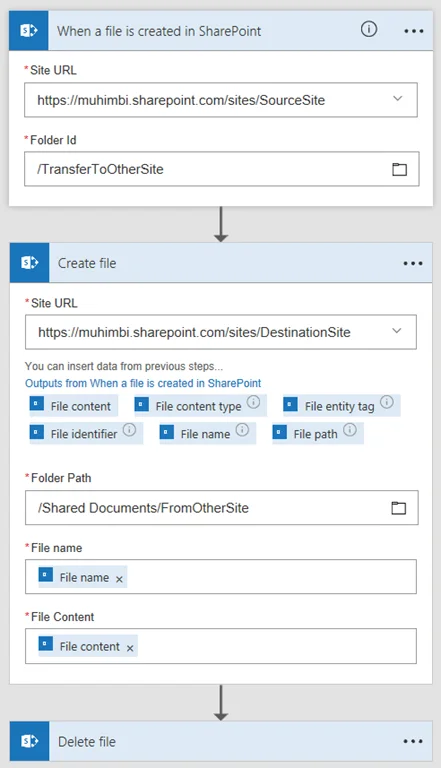
The trigger that starts the flow must be defined first, enter SharePoint when a file is created and select the displayed trigger. Enter the source site collection and folder (use the Folder browser if needed)
With the fields filled out, click New Step followed by Add an Action.
Enter SharePoint create file and select the appropriate action. You may be tempted to use the SharePoint Copy File action, but that is limited to copying files within the SAME site collection.
Fill in the blanks, for details see the screenshot below. Naturally substitute the sample site and folder names with your own.
That is it, enter an appropriate name for the flow at the top of the screen and click the Create Flow option. You can later extend the flow by adding a SharePoint Delete File action to delete the original file if that is no longer needed, in effect moving the source file.
On the My Flows screen make sure the newly created flow is enabled. Create a file in the source location, either by kicking off the SharePoint Designer workflow or manually placing a file in the source folder. After a few seconds a copy of the file should show up in the destination site collection.
This is just a start, using some very simple steps Flow allows very powerful integration scenarios. By just adding one more action I was able to also copy the source file to my OneDrive folder, which in turn synced the file to my local system.
This allowed me to create a cool Flow where I have a local OneDrive folder that I can drop any file in, which is then synced automatically to OneDrive, which kicks off a Flow that converts the file to PDF, write it to another OneDrive folder, which in turn is synced back to my local system. A universal Desktop PDF Converter using just a few Flow actions… awesome!
For more details about Muhimbi’s workflow actions for carrying our Conversion, Merging, Watermarking, Securing and OCR of files, have a look at our website.
Any questions or comments, leave a message below or contact our friendly support desk, we love to help.
Labels: Articles, Flow, PDF Converter, PowerApps, SharePoint Online, Workflow


