
We recently released the Muhimbi PDF Converter Xtension for Nintex Automation Cloud. You can download it here or learn more about available Muhimbi deployments for Nintex on our product page.
The Muhimbi PDF Converter for SharePoint On-Premises comes with support for a large number of file formats. MS-Word, Excel, InfoPath, PowerPoint, Visio, AutoCAD, Images, you name it. Although each file format has its own obvious uses, the ability to convert HTML is particularly useful as – in the age of Apps and Web Browsers - more and more information is exposed as either raw HTML or a URL.
We recently overhauled our HTML Converter to bring it in line with the latest standards. As a result it can convert some of the most advanced HTML content including SharePoint Pages, List Items and, the focus of this blog post, Nintex Forms.
As InfoPath is no longer actively developed by Microsoft, a number of alternatives have popped up over the years. As Nintex has a strong foothold in the SharePoint market, mainly because of their Nintex Workflow product ( which we fully support), their Forms solution is an obvious choice for many. Quite a few of our customers use Nintex Forms in combination with the Muhimbi PDF Converter for SharePoint On-Premises to convert a form to PDF when it reaches a certain stage, merge it with other documents, watermark it and archive / email it.
In this post we’ll show how to create a simple List, Nintex Form and associated Nintex Workflow to convert the form to PDF once the List Item has reached the Approved stage. The workflow is then enhanced with the ability to convert and merge all attached files.
Please keep in mind that – as per Nintex’ own guidelines – Nintex Forms is a tool for data capture, not for print (and by extension PDF) output. As a result you may need to be creative at times to achieve the desired results. In some cases it may be better to just take the SharePoint columns, filled out using Nintex Forms, and dynamically generate HTML orWord XMLbefore passing that into the Muhimbi PDF Converter.
Prerequisites
Before you begin, please make sure the following prerequisites are in place.
- Muhimbi PDF Converter for SharePoint On-Premises, version 8.3 or later. ( Download)
- Enable Muhimbi’s Nintex Workflow actions in Central Administration. ( Details)
- Nintex Forms (We used the SharePoint 2016 version, but previous versions should work equally well).
- Nintex Workflow (The obvious choice, but it works equally well using our SharePoint Designer workflow actions).
- To make sure the Muhimbi Conversion Service has the appropriate privileges to access the list items, make sure the Windows Internet settings - for the account the Conversion Service runs under – is set to Automatic logon (run inetcpl.cpl / Security / Select Zone / Custom Level / User Authentication / Automatic login with current user name and password). For details about troubleshooting authentication issues, see this Knowledge Base article.
- Working knowledge of both Nintex Forms and Nintex Workflow.
Please note that this tutorial is for the on-premise version of SharePoint (2007-2016). Although both the Muhimbi PDF Converter and Nintex forms are available for SharePoint Online as well, due to technical reasons it is not possible to use them together at the time of writing. We are working on it though.
Getting started
OK, let’s get started by navigating to your favourite Site Collection, choosing the option to create a new Custom List and naming it Nintex Forms Demo.
Once the list has been created, add a column named Approved, of type Yes/No, with the default set to No. There are many ways to deal with approvals in SharePoint, for the sake of simplicity we use this simple field, but naturally you can easily modify the workflow to deal with your particular situation.
As a next step, modify the List’s Form using the Customise the Item Form option. (In SharePoint 2016 this can be found in the List Ribbon / Customize List section. This results in the following screen:
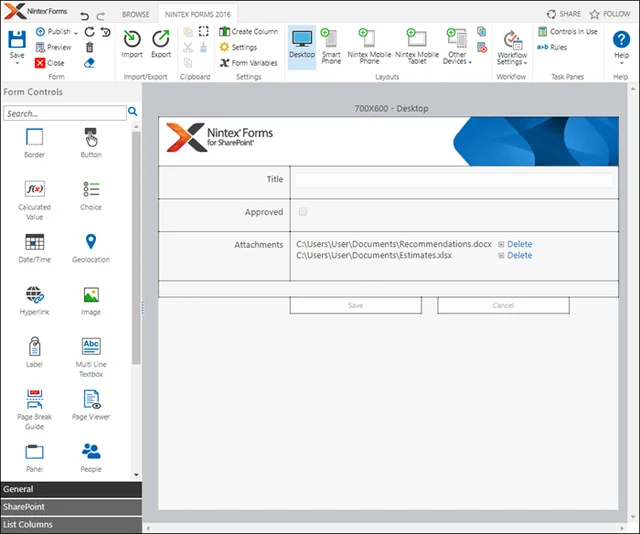
Obviously you have the option to customise the form to your heart’s content, but for the purpose of this demo the default looks great. Choose the option to publish the form.
With the custom form created, let’s create a workflow to convert the form to PDF once the item has been approved. Before we do, we need to figure out the URL of the form, as we need this information later.
- Add a new List item, fill it out and submit it.
- After submitting, click the newly created item to open it in Display mode.
- Copy the contents of the URL up to, and including, the ‘?ID=1’ section.
- Save it somewhere, we need it later in our workflow.
Close the form if it is still open, and from the List ribbon select the option to Create a Workflow in Nintex Workflow.
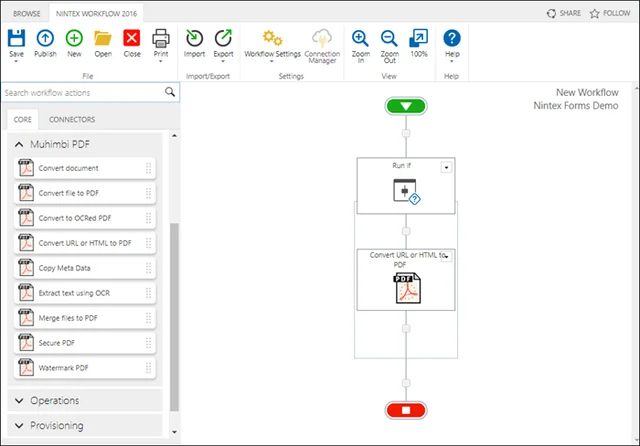
As a first step, we need to check if the list item has been approved, so insert the Run if workflow action and double click it to configure. Update it to set the Where clause to Approved equals Yes.
Next, drag the Convert URL or HTML to PDF workflow action inside the Run if action. Details about this action can be found here and here, for this example we fill it out as follows:
Destination Path: The path and file name to write the converted form to. Assuming there is a standard Shared Documents library in the current site, enter Shared Documents/Form-ID.pdf, where ID is inserted via Insert Reference / Item Properties / ID. Naturally you can choose your own output path and file name, for details see this blog post.
Source URL: Remember that we earlier saved the URL to the form’s display mode? Paste it here and make sure that behind ?ID=, you enter the Item’s current ID via Insert Reference / Item Properties / ID. The result should look something like
http://YOUR_HOST_NAME/sites/Demo/Lists/Nintex%20Forms%20Demo/DispForm.aspx?ID={ItemProperty:ID}
HTML Engine: Although no need to set this in a clean – and unmodified – deployment of the Muhimbi PDF Converter for SharePoint On-Premises, there is a chance that an administrator has changed the default HTML Engine in the config file. To be sure, set this option to WebKit.
Media Type: Similar to the HTML Engine option, the default is set correctly for a clean deployment, but – as it is possible to override this setting in the config file – set it to Print.
Conversion delay: More about this later, but if you end up with an incomplete PDF rendition of the form, set this value to something like 2000 (milliseconds), which is the time to wait between loading the form, resolving all external dependencies, and starting the PDF Conversion process.
Finally, use the Workflow Settings option to start the workflow when items are created and modified.
The final workflow should look as follows, publish it, name it Convert Form to PDF upon approval, and close the editor.
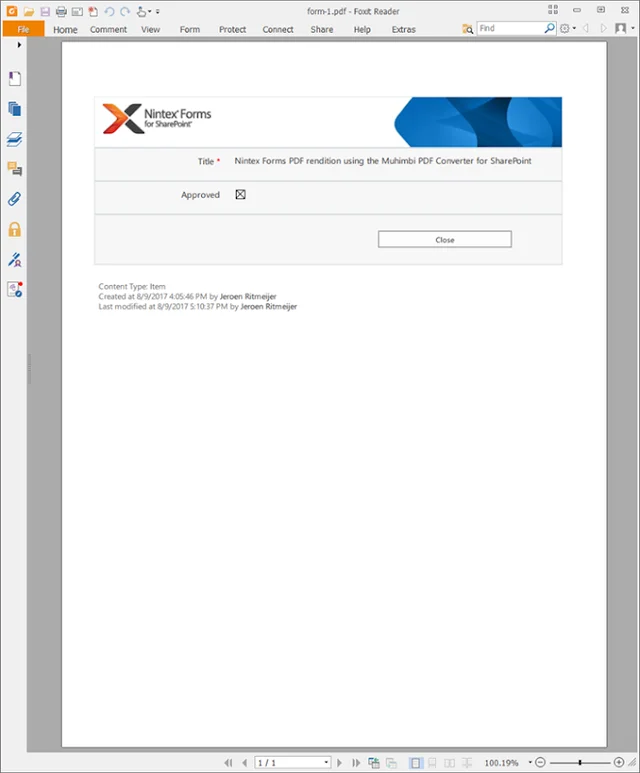
With everything in place, create or update a list item and set the Approved field to Yes. After a few seconds a PDF rendition of the form will be placed in the output folder and look similar to the following.
Fine tuning
As you can see above, the generated PDF looks great and provides a good rendition of the form. However, you may want to tweak things around a bit. As Nintex Forms provides the ability to provide custom CSS as well as JavaScript, the sky is the limit as our HTML Converter supports both.
For example, you may not want to include the Content Type, Created at, and Last modified at labels in the PDF. We can solve this by setting the associated HTML element’s style to display: none. The trick is to figure out the name of the element first.
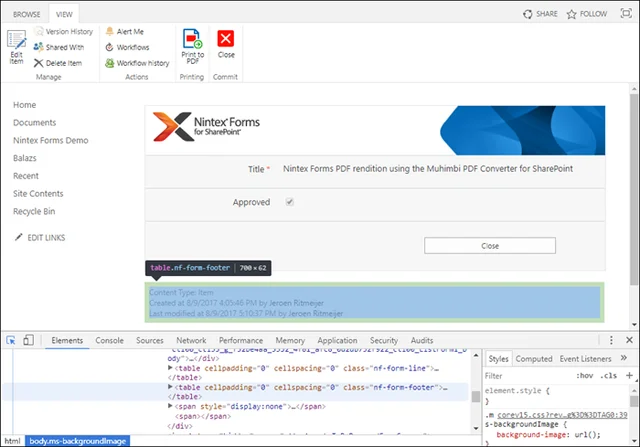
- Click the list item (not the PDF) to open it in Display mode in Google Chrome.
- Press CTRL-SHIFT-C to open the Element picker.
- Move the mouse near the area you want to hide. You will usually find a container that surrounds the entire area.
- Write down the name of the element, in this case table.nf-form-footer, so we can create some CSS to hide it. See screenshot below.
To hide these labels, re-open the Nintex Forms editor, click on Settings and open the Custom CSS section. A number of CSS entries may already be present, so scroll to the bottom and add the following:
@media print
{
table.nf-form-footer {display: none; }
input[type=submit] { display: none; }
}
Please note the following:
- We wrap the CSS in a ‘@media print’ section to make sure these changes are only applied during printing (PDF Conversion is considered printing).
- Additional CSS has been added to hide buttons as well. There is no need to include these in the PDF.
Save the settings and republish the form to activate the changes. Create / update a list item, make sure it is set to Approved and open the newly generated PDF. The information we are not interested in has now been removed from the PDF.
As mentioned previously, the sky is the limit. Use CSS and JavaScript (JQuery?) to change the form as much as needed. Our PDF Converter will apply your customisations automatically.
TOP TIP: If you wish to run JavaScript only during PDF Conversion, add a value to the URL (e.g. PDF=True) and check for the presence of that value as part of your custom JavaScript.
Advanced fine tuning
In addition to changing the look and feel of the form using CSS and JavaScript, the Muhimbi PDF Converter makes it possible to tweak other settings as well, specifically:
- Page Orientation: Change the orientation to suit the layout of your form. This setting can be changed globally in the Conversion Service’s configuration file, or on a request by request basis in the Workflow Action.
- Page Margins: By default, a 0.5 inch margin surrounds the content of the page. This setting can be modified in the Conversion Service’s configuration file.
- Page Size: The default option for the page size is Letter, this can be changed – e.g. to A4 – in the Conversion Service’s configuration file.
- ViewPort Size: This one is tricky, but powerful if you need it. It is possible to simulate the size of the browser window. This can come in useful when converting a form that was designed for Mobile use. E.g. use 375x667 to simulate an iPhone 6. This setting can be controlled via the workflow action as well as the configuration file.
For details about how to edit the Conversion Service’s configuration file, see this Knowledge Base article.
Page breaks
Although Nintex Forms comes with a built-in page breaking facility, this is not recognised by third party browsers such as Google Chrome and Muhimbi’s HTML Converter. We’ll spare you the full details, but it is related to how Nintex Forms positions the various form elements on screen.
We are working with Nintex to see if we can implement a workaround. Until then we recommend to pay extra attention when authoring large forms that span multiple pages. During the design phase, carry out tests using the Muhimbi PDF Converter and make sure all looks well once converted to PDF.
Merging Attachments
Still reading? Wow, you must be really interested in this topic.
Let’s make a useful enhancement to the workflow by converting all the list item’s attachments, and merging everything – including the form itself - into a single PDF. This is where things get fun, and a bit complex as Nintex Workflow does not provide any workflow actions for dealing with attachments.
Please note that this enhancement uses the REST service introduced in SharePoint 2013. For older versions this sample will need to be changed to use the Web Service interface utilised by older SharePoint versions. Have a look at this post in the Nintex Community .
Before we modify the workflow, please make sure that in Nintex’ Central Admin section the Query XML action is enabled.
Edit the workflow we created earlier and add another Run if action INSIDE (not after) the previously created Run if action. Double click it to configure, and set the Where clause to Attachments equals Yes.
As we need a workflow variable to store the list of attachments in, create a workflow variable named Attachments of type Collection.
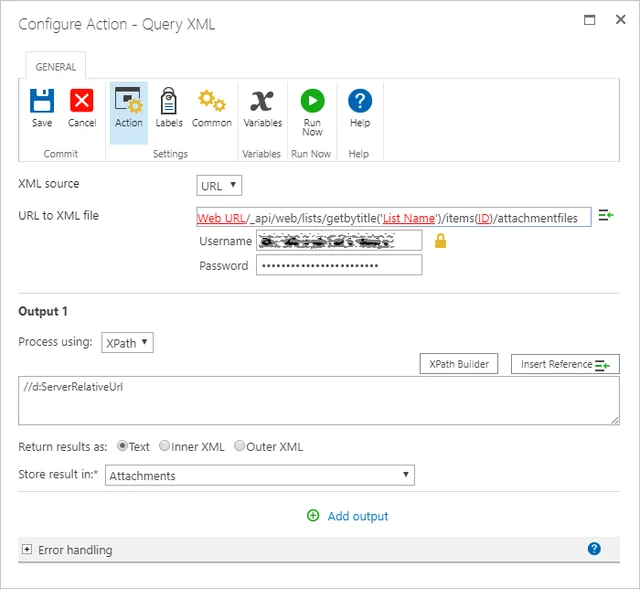
Next, drag the Query XML workflow action inside the Run if action, and fill it out as follows:
URL to XML file: Insert the URL to the REST end-point for the current item. The URL will be similar to the following, make sure you enter your own host name, site name, list name (if different from our example), and replace the ‘2’ in items(2) with a reference to the current item id. (See screenshot below for an example where we have used Insert Reference to make it all dynamic).
http://YOUR_HOST_NAME/sites/Demo/_api/web/lists/getbytitle('Nintex%20Forms%20Demo')/items(2)/attachmentfiles
Username / Password: Enter the credentials of a user with the privileges to read the item’s data.
Output 1: Enter the following XPath statement //d:ServerRelativeUrl
Store results in: Select the Attachments workflow variable created earlier.
The end result should look as follows.
We are almost there, we have a PDF rendition of the main form and a list of attachments. All that is needed is to merge it all into one PDF for easy archiving / distribution.
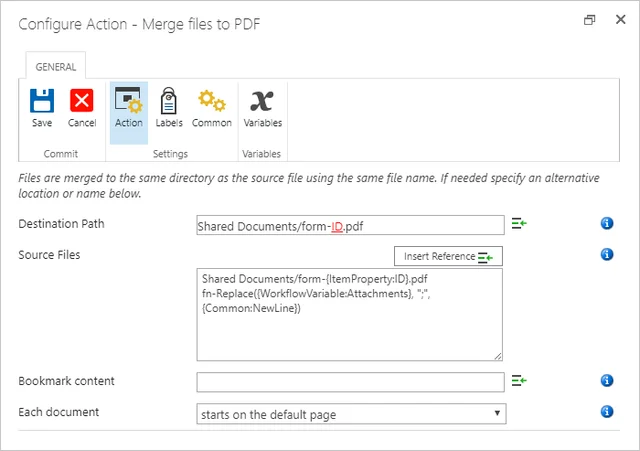
Directly after the Query XML action, insert the Muhimbi Merge files to PDF action. Details about this action can be found here, for this example we’ll fill it out as follows:
Destination Path: In this example we want to overwrite the file that was generated in the first step, so we specify the exact same path and file name as before, Shared Documents/Form-ID.pdf, where ID is inserted via Insert Reference / Item Properties / ID. Amend this to match your specific requirements.
Source Files: As we want to include the PDF rendition of the form created in step 1, on the first line we enter the path and file name, including the reference to the current item:
Shared Documents/form-{ItemProperty:ID}.pdf
On the next line we want to insert the list of attachments. The list retrieved earlier uses a ‘;’ to delimit each individual attachment. The Muhimbi Merge action requires each attachment to be on its own line, so we carry out a Replace operation:
fn-Replace({WorkflowVariable:Attachments}, ";", {Common:NewLine})
That is it, we can ignore the other fields, the results should look as follows.
The overall workflow is relatively simple, and looks as follows. All the magic happens inside each action.

We are DONE!
Publish the workflow, add or edit a list item, add one or more attachments (making sure the file format is supported), set the list item to Approved and save it. The workflow will complete in a few seconds, once completed you can find a PDF file containing both the Nintex Form and all attachments in the Shared Document library.
Download the workflow here. Once imported, please review the various workflow actions, check that the paths are correct for your particular situation and enter the credentials in the Query XML action.
Further enhancements
When we earlier mentioned that we were done, that was an obvious lie. We are never done, people always want more. The possibilities are endless, some refinement that come to mind:
- PDF/A: Convert the end result to PDF/A, a specific subset of the PDF standard for archiving purposes and THE format recommended / demanded by most regulatory bodies. Providing you have a Muhimbi OCR and PDF/A Archiving add-on license, the generated PDF file can be fed back into the Muhimbi Convert Document activity alongside some XML.
- Unsupported attachments: Although the Muhimbi PDF Converter supports the most common file types, you may want to filter out attachments for file types that are not supported (e.g. zip).
Troubleshooting
With a workflow this awesome, there are always things that can go wrong. The most common problems are as follows:
- Authentication: As mentioned in the Prerequisites section, it is essential that the Muhimbi Conversion Service can authenticate against the list item. For details see this Knowledge Base article.
- Incomplete Forms: If the Nintex Form is very complex and depends on external resources (e.g. database requests, external images, or custom JavaScript), then it may take some time for the form to fully finish loading resulting in an incomplete PDF. If this happens, try to gradually increase the Conversion Delay, part of the Convert URL or HTML to PDF workflow action. (The value is specified in milliseconds, try 2000 for a 2 second delay).
That is all for today. Feel free to enhance the workflow by watermarking the end result, securing the file, performing OCR and merging it with other files.
Any comments or questions? Leave a message below or contact our friendly support desk. We are here to help.
Labels: Articles, HTML, Nintex, Nintex Forms, pdf, PDF Converter