

As of version 1.4, our PDF Converter for SharePoint supports the refreshing of MS-Word DocProperties with the associated content stored in a Document Library’s custom columns. In essence this functionality allows custom PDF Documents to be created on the fly.
This article shows how to create a system that allows business users to fill out a holiday request form in SharePoint and automatically file the request in PDF format. This example has been kept simple on purpose, feel free to add additional workflow logic to it.
Before you start, make sure the PDF Converter for SharePoint (v1.4 or newer) has been installed and you have access to a site collection with the appropriate rights to create workflows. Some basic knowledge about creating and configuring document libraries is assumed.
Update: This article mentions several times that this only works with DocProperties in documents saved in pre-Office 2007 based MS-Word documents. As of version 3.0 of the product we also support fields inserted using MS-Word 2007 Quick Parts.
So, with that out of the way let’s get going.
Create and configure the Document Library
Create a document library named ‘Holiday Requests’.
Create the following columns (feel free to create a new Content Type, but it is not necessary for this demo)
Column name: Requester, Type: Person or Group
Column name: StartDate, Type: Date and Time
Column name: EndDate, Type: Date and Time
Column name: Reason, Type: Choice, Choices: Holiday, Personal leave, Skiving
Column name: Status, Type: Choice, Choices: Pending, Approved, Denied, You are fired
Column name: Remarks, Type: Multiple Lines of Text
In the document library, create a folder named ‘Approved Requests’.
We should now have something that resembles the screenshot below. Note that I have removed some of the default columns from the view.

Create the MS-Word Template
Follow the instructions below to create the template or download it from our site.
In the new Document Library create a new Document and immediately save it in MS-Word 2003 format as ‘Holiday Request.doc’. Do not use MS-Word 2007 format initially as it will not allow you to insert DocProperties ‘the MS-Word 2003 way’ (See the list of issues at the end of this article).
Close the document.
Edit the properties for the document that was just saved and give each field a temporary value. If this is not done then MS-Word 2007 does not allow the DocProperties to be inserted (nice!).
Edit the previously saved document and insert a 2x6 table into the document.
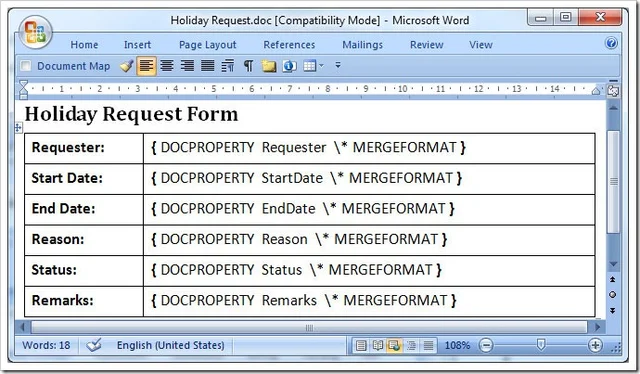
In the left most column add the name of each of the previously inserted columns. Feel free to use spaces and additional descriptions as this is just text that will be converted as is.
In the right most column enter each corresponding DocProperty from MS-Word 2007’s Insert / Quick Part / Field / DocProperty list. (When using MS-Word 2003, use Insert / Field / DocProperty. From memory, I don’t have Word 2003 here).
Clear the content of all fields from MS-Word or save the document and clear all fields using SharePoint.
If you know how to then make this document the default template for the Document Library. Otherwise leave the document where it is.
We now have something that looks like the following document. Note that I have right clicked on each DocProperty and selected Toggle Field Codes in order to visualise them.
Create and configure the workflow
Start SharePoint Designer and open the site collection that contains the ‘Holiday Requests’ library.
From the File menu select New > Workflow.
On the first screen of the Workflow wizard, specify the following settings:
Name the workflow ‘Convert Holiday Requests to PDF Format’.
Select the ‘Holiday Requests’ list.
Select the 2nd and 3rd checkboxes to make sure the workflow is triggered whenever a document is created or (its status) is updated.
Click the ‘Next’ button to proceed.
We need to create a workflow consisting of 2 steps. As we will be updating the value of a column, we cannot convert the document in the same step as the changed value has not yet been persisted to the Document Library. By moving the ‘Convert to PDF’ action to the 2nd step we ensure the latest changes are available to the PDF Converter.
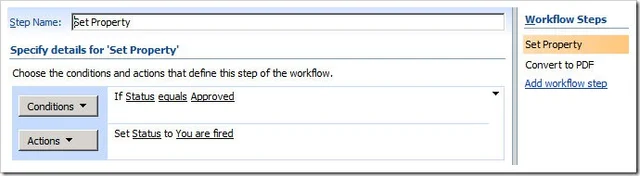
Step 1 – Check Status and update if needed.
From the ‘Conditions’ menu select ‘Compare Holiday Requests field’. This inserts the ‘If valueequalsvalue’ condition.
Click the first ‘value’ and select ‘Status’.
Click the second ‘value’ and select ‘Approved’ from the list.
In the ‘Actions’ menu select ‘Set Field in Current Item’.
Click ‘field’ and set it to ‘Status’.
To mess around with the requester, and to show modified properties are automatically included in the PDF file, set ‘value’ to ‘You are fired’.
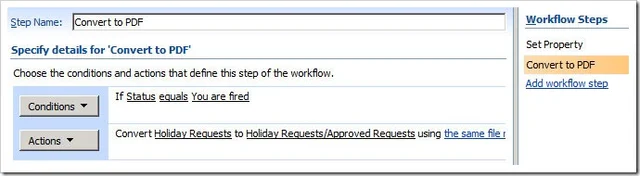
Step 2 – Convert to PDF
Insert a new step and name it ‘Convert to PDF’
Add a Condition, as described above, to check if the ‘Status’ is now set to ‘You are fired’.
From the ‘Actions’ menu select' ‘Convert to PDF’.
The following action is inserted:
Convert this document to this url using the same file name and include / exclude meta data. Store the converted item details in List ID: Variable: List ID, Item ID: Variable: List Item ID.
Let’s examine what the various options mean:
this document: Specify which document to convert. Click this option and make sure ‘Current Item’ is selected.
this url: Specify the location the converted file will be written to. The following options are available:
Leave it empty: When no value is specified then the converted document is written to the same folder as where the source file is located.
Site Relative URL: By specifying a URL relative to the current site, e.g. ‘subsite/shared documents/PDF Files’, any folder location in the current site collection can be targeted. This is the option we want to use so enter Holiday Requests/Approved Requests.
Web Application relative URL: Using a URL that is relative to the entire web application, e.g. ‘/sites/Press Office/Public Documents/To Distribute’, any folder location in any site collection can be targeted.
the same file name: The name of the converted file can be specified here. In our case we’ll leave it empty to make sure we use the same name as the original document.
include / exclude meta data: In case of sensitive documents we may want to strip any custom SharePoint columns from the file. Select ‘Include’.
Variable: List ID: A new workflow variable named ‘List ID’ is automatically created. After the file has been converted, this variable will contain the ID of the list the converted file was saved to. This can later be fed into another action in order to manipulate this file further.
Variable: List Item ID: A new workflow variable named ‘List Item ID’ is automatically created. After the file has been converted, this variable will contain the ID of the item the converted file was saved to. This can later be fed into another action in order to manipulate this file further.
Click ‘Finish’ to save and activate the Workflow
Test The Workflow
Test the workflow as follows. Note that MS-Word 2007 can be a bit picky with DocProperties so make sure to save each document in MS-Word 2003 format.
If you have made the document the default template then select ‘New’ in the document library, otherwise copy a new version of the template manually into the library.
Specify all properties, either from SharePoint or MS-Word. Don’t set the status to Approved.
Save and Close the document if it is still open.
Use SharePoint to edit the properties of the document and set the ‘Status’ to ‘Approved’. Update any other properties as well if you wish.
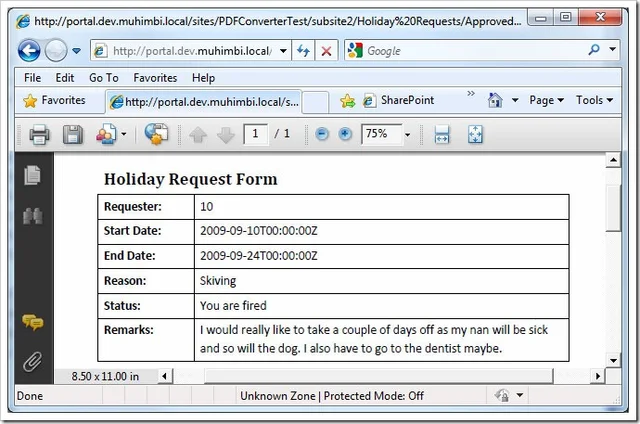
Once the workflow has finished you will find a PDF file in the Approved Requests folder.
The generated PDF file now looks as follows. Note that the User ID is inserted rather than the user name. I’ll leave it as a exercise for the reader to retrieve this information and insert the full user name using a DocProperty.
Please note that the current implementation has some limitations:
DocProperties containing spaces and quotes are not supported: DocProperty field names are not allowed to contains spaces or double quotes (").
Custom Formatting in DocProperties is not supported: When a DocProperty contains additional formatting information then this is not automatically applied. For example {DOCPROPERTY DateField \@ "yyyy/MM/dd"}.
Doc Properties inserted using MS-Word 2007 'Quick Parts' are not supported: Currently the PDF Converter only supports DocProperties that have been inserted using the 'pre MS-Word 2007' Insert Field -> DocProperty functionality. Please do not use MS-Word 2007's Insert -> Quick Parts -> Document Property.
For full details, see version 1.4’s release notes. We expect to resolve these issues in the next few weeks.
Update: This article mentions several times that this only works with DocProperties in documents saved in pre-Office 2007 based MS-Word documents. As of version 3.0 of the product we also support fields inserted using MS-Word 2007 Quick Parts.
Labels: Articles, News, PDF Converter, Workflow