
Our customers are using our PDF Converter for SharePoint in ways we never imagined. Recently we were contacted by a customer who uses the product to automatically convert all files, including the actual EML file, sent to an email enabled Document Library to PDF Format.
This gave me a great idea for a new blog post as I am sure that converting files to PDF Format via email is something that many of our customers will be interested in. After all, an entire industry has been build around just that concept.
What follows is a description of how to use SharePoint designer to build a simple workflow to convert documents mailed to a document library to PDF Format and return an email with a link to the converted document. If you wish, the converted file can be included in the email as well as described here.
Update: As of version 5.2 of the PDF Converter we have full support for MSG based emails as well.
Prerequisites
In order to create this workflow you need the following prerequisites. Some details can be found in the links section at the end of this posting.
- A SharePoint Server running WSS or MOSS.
- Incoming Email must be enabled in Central Admin / Operations / Incoming Email Settings.
- The Muhimbi PDF Converter for SharePoint must be installed on the server.
- A copy of the free SharePoint Designer 2007.
- You may want to consider installing Service Pack 2 on your SharePoint server as that makes email enabled workflows much more stable.
Creating the Document Library
Before we can create the workflow we need to enable and configure the Document Library using the following steps:
Create a new Document Library in the site of your choice. I named mine ‘Workflow’, but I am sure you can come up with a better name.
Mail enable the document library from Settings / Document Library Settings / Incoming e-mail settings and configure it as follows:
- Allow Incoming Email.
- Give it an email address of your preference. I named it pdfconvert.
- Select Save all attachments in folder grouped by e-mail sender.
- Disable Overwrite files with the same name.
- Disable Save original e-mail unless you want the text of the email to be converted to PDF as well.
- Disable Save meeting invitations.
- Select the Security Policy of your choice. I set it to Accept e-mail messages from any sender.
When e-mail is enabled, SharePoint automatically adds a number of new columns to the Document Library, including the E-Mail From field that holds the address of the user who sent the email. Unfortunately the content of this field is not suitable for the email Workflow Action so a Calculated Column needs to be created to change the email address to something usable.
- From the Settings Menu select Create Column.
- Name the column Return Address.
- Select Calculated as the type.
- Enter the following in the Formula field: =MID([E-Mail From],FIND("<",[E-Mail From])+1,FIND(">",[E-Mail From])-1-FIND("<",[E-Mail From]))
Creating the Workflow
Finally we need to create a workflow that converts all files that are not already in PDF format to PDF format and send out an email to the originator with a link to the location of the converted file.
Start SharePoint Designer and open the site collection that contains the new Workflow Document library.
From the File menu select New > Workflow.
On the first screen of the Workflow wizard, specify the following settings:
- Name the workflow Convert file to PDF.
- Select the Workflow list.
- Select the 2nd and 3rd checkboxes to make sure the workflow is triggered whenever a document is created or (its status) is updated.
- Click the Next button to proceed.
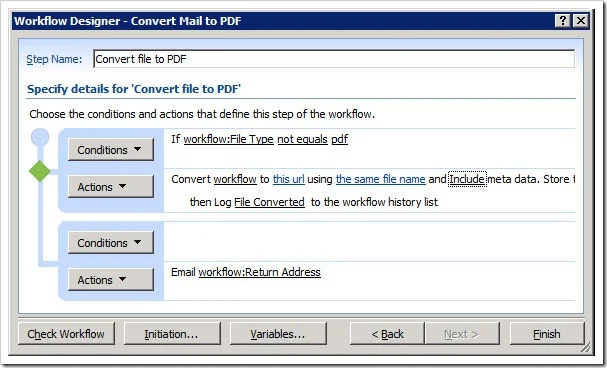
We are now ready to create the workflow. From the Conditions menu select Compare any data source. This inserts the If valueequalsvalue condition.
Click on the first value followed by the display data binding (fx) button.
Select Current Item as the Source and select File Type in the Field. Click the OK button to continue.
Change equals to not equals.
Click on the second value and select pdf from the list.
With the conditions in place we can now add the Actions, which is where the magic happens.
From the Actions menu, select Convert to PDF. It may be hidden behind the More Actions option.
The following action is inserted:
Convert this document to this url using the same file name and include / exclude meta data. Store the converted item details in List ID: Variable: List ID, Item ID: Variable: List Item ID.
Let’s examine what the various options mean:
- this document: Specify which document to convert. Select the option and make sure Current Item is selected.
- this url: Specify the location the converted file will be written to. The following options are available:
- Leave it empty: When no value is specified then the converted document is written to the same folder as where the source file is located. This is the option we want so leave this field empty.
- Site Relative URL: By specifying a URL relative to the current site, e.g. subsite/shared documents/PDF Files, any folder location in the current site collection can be targeted.
- Web Application relative URL: Using a URL that is relative to the entire web application, e.g. /sites/Press Office/Public Documents/To Distribute, any folder location in any site collection can be targeted.
- the same file name: The name of the converted file can be specified here. In our case we’ll leave it empty to make sure we use the same name as the original document.
- include / exclude meta data: In case of sensitive documents we may want to strip any custom SharePoint columns from the file. In this scenario we need the meta data as the Return Address is stored in there, so select include.
- Variable: List ID: A new workflow variable named List ID is automatically created. After the file has been converted, this variable will contain the ID of the list the converted file was saved to. This can later be fed into another action in order to manipulate this file further.
- Variable: List Item ID: A new workflow variable named ‘List Item ID’ is automatically created. After the file has been converted, this variable will contain the ID of the item the converted file was saved to. This can later be fed into another action in order to manipulate this file further.
Insert a new action named Log to History List and enter File converted to PDF Format.
The files are now automatically converted to PDF format. Next we will add functionality to the workflow that sends out an email alert for each generated PDF Document.
Click Add ‘Else-if’ Conditional Branch.
From the Actions menu, select Send an Email. It may be hidden behind the More Actions option.
Click this message to open the email composition window.
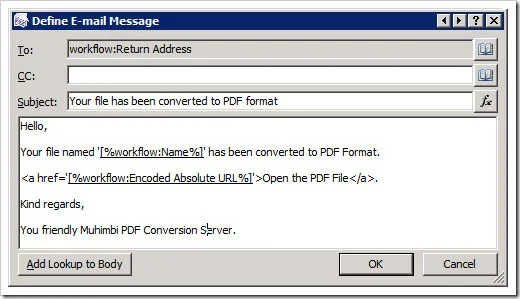
Click the address book button next to the To field.
Select the Workflow lookup address and select Return Address from the Current Item.
Enter a Subject of your choice or copy the Subject from the screenshot above.
Compose test for the email body. In order to create a link to the generated PDF file, enclose some text with <a href=’’></a>, insert the cursor between the two single quotes, click the Add Lookup to Body button and select Encoded Absolute URL from the Current Item.
That’s it, you are done. Click OK on the email composition Window followed by the Finish button on the main workflow window.
Testing
Providing everything has been setup and configured correctly, you can carry out a test by sending an email with one or more MS-Word, Excel or other Office files to the email address registered on the Document Library. The Document Library will pick up the file usually within a minute and create a folder named after the originator. The files will be stored inside the folder and workflow progress can be followed on each individual file.
For each converted file a separate email confirmation will be send back to the originator with a link to the converted PDF file.
Further improvements
The solution provided in this article can be used with great success in any Production environment. However, you may want to make some improvements, for example:
- Attach the converted PDF file to the email as described here.
- Run a separate workflow to periodically delete old files as per this article.
- Secure the converted files to ensure only the sender can access them. This is quite simple using our Workflow Power Pack.
Useful Links
- Enable and configure e-mail support for a list or library (Office On-line)
- Planning Incoming Email (Technet)
- Email enabled workflows don’t trigger (Microsoft Support)
- Practical examples of sending email in a workflow (Office On-line)
.
Labels: Articles, News, PDF Converter, Workflow