
The Muhimbi PDF Converter for SharePoint has had the ability to secure PDF files for quite some time, but it always required a separate product, which increased complexity, and more importantly cost.
We are happy to announce that as of version 4.1 the product now ships with a native SharePoint Designer Workflow Activity that allows security settings such as the Open Password, Owner Password and document restrictions such as Printing and Content Copying to be applied from a friendly SharePoint Designer workflow.
Update: As of version 6.0 it is possible to use the SharePoint User Interface to apply user specific security when a file is opened .
The best way to show how this works is by example. What follows is a walkthrough of how to create a SharePoint Designer Workflow to automatically apply security settings to any new or modified PDF file in a Document Library. In this example we use SharePoint Designer 2010, but it works just as well in SharePoint Designer 2007.
Before we begin, let’s have a look at the options provided by the new Secure PDF workflow activity.

In typical Muhimbi fashion, the workflow sentence is consistent with our other Workflow Activities (e.g. Converting / watermarking), and is largely self-describing.
this document: The document to apply the security settings to. For most workflows selecting Current Item will suffice, but some custom scenarios may require the look up of a different item. You may also want to check that the file type of the document is ‘ pdf’ before trying to apply security.
this file: The name and location of the secured file. Leave this field empty to overwrite the source file with the secured copy. Enter a path, including the Document Library and any folder names, to write the secured file to a separate location. E.g. “ shared documents/secured files/confidential.pdf”. You can even specify a different site collection.
open password: When specified, anyone who wants to open the PDF file will need to enter this password.
owner password: When specified, anyone who wants to change the security settings on the PDF file will need to enter this password.
disable options: One or more restrictions to apply to the PDF file, separated by a pipe ‘|’ character . By default it applies all restrictions ( Print|HighResolutionPrint|ContentCopy|Annotations|FormFields|ContentAccessibility|DocumentAssembly), but any combination is allowed. Enter the word Nothing to not apply any restrictions. In order to activate these settings you must supply an owner password.
List ID: The ID of the list the secured file was written to. This can later in the workflow be used to perform additional tasks on the file such as a check-in or out.
Item ID: The ID of the secured file. Can be used with the List ID.
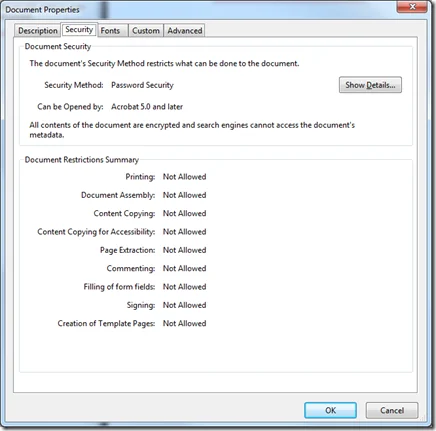 Properties of a Secured PDF File.
Create the workflow as follows:
Download and install the Muhimbi PDF Converter for SharePoint.
Make sure you have the appropriate privileges to create workflows on a site collection.
Create a new workflow using SharePoint Designer.
Associate the workflow with the library of your choice, tick the boxes next to both ‘ Automatically start….’ options and proceed to the next screen.
Because we are running the workflow when PDF files are created as well as modified, a new Yes/No column named Secured will need to be added to the document library using a default value of No. This way we can mark a document as secured and stop workflows from recursively triggering. Alternatively, if files are secured in place, you can decide to just trigger the workflow when new files are added.
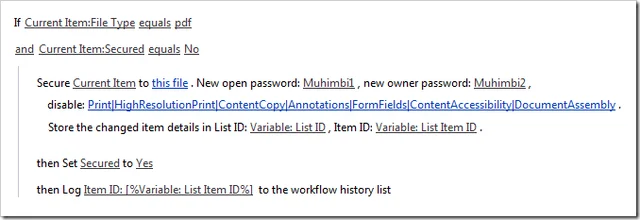
Design the workflow as per the following screen. In summary it does the following:
- Check if the file is in PDF format. Otherwise security cannot be applied.
- Check if the file has already been secured. If it has then it doesn’t need to be secured again.
- The PDF File is secured in place. Both Open and Owner passwords are applied and all restrictions are set.
- The file is marked as Secured so the workflow doesn’t repeatedly run.
- A status message is written to the workflow history.
Publish the workflow and create / convert / upload a new PDF file in the Document Library. After a few seconds the workflow column will change to Completed, indicating that the file has been secured successfully.
Labels: Articles, News, pdf, PDF Converter, Workflow