

We recently released the Muhimbi PDF Converter Xtension for Nintex Automation Cloud. You can download it here or learn more about available Muhimbi deployments for Nintex on our product page.
Although it had been years in the planning, we didn’t really make a big deal out of the support for Optical Character Recognition (OCR) when we shipped it as part of version 7.1 of the PDF Converter for SharePoint. We did this for a good reason as – although the underpinnings were working well – the actual integration point with Nintex Workflow wasn’t as nice as we wanted it to be.
With the release of version 7.2 we are adding two new Workflow Activities to both Nintex Workflow and SharePoint Designer. The first activity, described in this post, can be used to convert scanned content into fully searchable PDFs. A separate post will detail the other new OCR Activity, which can extract text from scanned content. For a high level overview of our OCR facilities please read the original announcement.
This post describes the Nintex Workflow version of the Workflow Activity. The SharePoint Designer equivalent can be found here.
Optical Character Recognition… sounds quite complex, what would you need that for? Well, most organisations deal with scanned (or other bitmap based) content on a regular basis. Faxes are received in a digital inbox, invoices or legal documents are scanned and filed away in a file system / SharePoint library or other Document Management System. The problem is that this is ‘dead information’ that cannot be searched or indexed using traditional technology. Content is stored as one big image which cannot be indexed by search crawlers and, as a result, does not show up in search results.
This is where OCR comes in. OCR analyses image based content – e.g. a scanned PDF or an image embedded in an MS-Word file – applies some fancy recognition logic and then embeds the result in a PDF. The scanned content still looks the same, but you can now copy text from the document and search crawlers are clever enough to index this text as well. Confused? Have a look at the screenshot below.
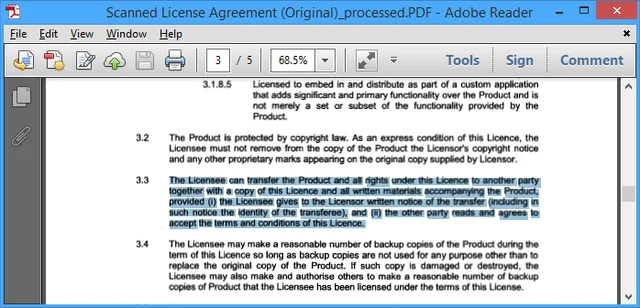
Scanned Document with OCRed text selected
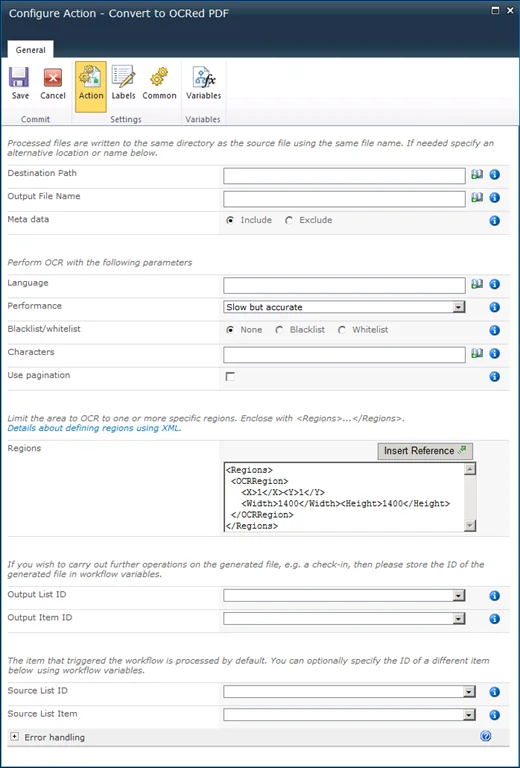
It is possible to carry out OCR using our standard Convert Document workflow activity, but that requires knowledge of our XML syntax, which - although powerful - is less than user friendly. To make life easier we have created a separate Workflow Activity named Convert to OCRed PDF. It is compatible with Nintex Workflow 2007, 2010 & 2013 and this is what it looks like.
Building a full example workflow is out of the scope of this post as it is relatively easy. For details see our generic PDF Conversion for Nintex Workflow example.
The fields supported by this Workflow Activity are as follows:
- Destination Path: The location to write the generated file to. Leave this field empty to use the same location as the source file. For details about how to specify paths to different libraries / site collections see this blog post.
- Output File Name: The name of the generated file. Leave this field empty to use the same name as the source file. Please note that if your source file is already in PDF format, and the Destination Path is the same as the Source Path, then leaving this field empty will overwrite it.
- Meta data: Control if the source file’s SharePoint meta-data is copied to the destination file.
- Language: The language the source document is written in. It defaults to English, but we currently (version 7.2) support Arabic, Danish, German, English, Dutch, Finnish, French, Hebrew, Hungarian, Italian, Norwegian, Portuguese, Spanish and Swedish.
- Performance: Specify the performance / accuracy of the OCR engine. It is recommended to leave this on the default Slow but accurate setting.
- Whitelist / Blacklist: Control which characters are recognised. For example limit recognition to numbers by whitelisting 1234567890. This prevents, for example, a 0 (zero) to be recognised as the letter o or O.
- Pagination: In some specific cases a single image spans multiple pages. Enable pagination for those cases.
- Regions: By default the entire page is OCRed. To limit OCR to certain parts of a page, e.g. a header and/or footer, you can specify one or more regions using our XML syntax. Have a look at this blog post, but only use the part that starts with (and includes) <Regions>…</Regions>.
- Output List ID: If you wish to carry out further actions on the generated file, e.g. send it by email or perform a check-in, then you can optionally store the ID of the List the file was written to in a workflow variable of type String.
- PDF List Item ID: Similarly to Output List ID, the Item ID of the generated file can optionally be stored in a workflow variable of type Item ID (in SharePoint 2007) or Integer (in SharePoint 2010 / 2013).
- Source List ID & List Item: The item that triggered the workflow is processed by default. You can optionally specify the ID of a different List and List Item using workflow variables. Please use the same data types as used by Output List ID and Output List Item ID.
- Error Handling: Similar to the way some of Nintex’ own Workflow Activities allow errors to be captured and evaluated by subsequent actions, all of Muhimbi’s Workflow Activities allow the same. By default this facility is disabled meaning that any error terminates the workflow.
For more details about using the PDF Converter for SharePoint in combination with Nintex Workflow see this Knowledge Base article.
Please note that the OCR and PDF/A Archiving add-on license is needed in order to use OCR in your production environment.
Any questions or comments? Leave a message below or contact us.
Labels: Articles, News, Nintex, OCR, PDF Converter, PDF Converter Professional