

Muhimbi's range of server side PDF Conversion products is very popular amongst InfoPath users as we are the only software vendor with a credible solution for converting InfoPath forms to PDF, including attachments and the ability to specify which views to convert. Yes, this post is about PowerApps, not InfoPath, bear with me for a moment while I get to the point.
Although InfoPath is still popular amongst our customers, it is no longer actively developed by Microsoft. Similar to many other organisations who operate in the Digital Forms field, we have been keeping an eye out for possible replacements. Nintex Forms is a popular choice for organisations who operate in the SharePoint field, but in the past year another player has emerged; Microsoft's own PowerApps solution, part of Office 365.
For details about how to use our software to convert Nintex Forms - including attachments - to PDF, see this blog post. The focus of this post is on how to use PowerApps to capture data and turn that data into a richly formatted PDF. Please note that this article is NOT about converting the layout of the PowerApp screen to PDF. Due to architectural difficulties, that is currently not possible.
In this post we will:
- Create a simple PowerApps form to capture user data.
- Create a Microsoft Flow to use the captured data, enrich it with HTML, and convert it to PDF.
- Invoke the Flow from PowerApps.
Although the Muhimbi Connector can be added to PowerApps directly, at the time of writing PowerApps does not have any built-in facilities for dealing with the generated PDF file. To keeps thing easy to understand, we carry out the actual PDF generation in Flow, from where the file can be emailed, or passed on to a service such as SharePoint, OneDrive, DropBox etc.
Update (2018): It is now possible to directly interact with the Muhimbi Actions from PowerApps, without the need for Flow. Check out this (3rd party) blog post about how to achieve this.
Prerequisites
Before you begin, please make sure the following prerequisites are in place:
- An Office 365 subscription with access to PowerApps and Flow.
- Muhimbi PDF Converter API or Muhimbi PDF Converter for Power Automate full, free or trial subscription
- The appropriate privileges to create PowerApps and Flows.
- Working knowledge of both PowerApps and Flow. This is not a generic tutorial for those technologies.
Building the PowerApp & Associated Flow
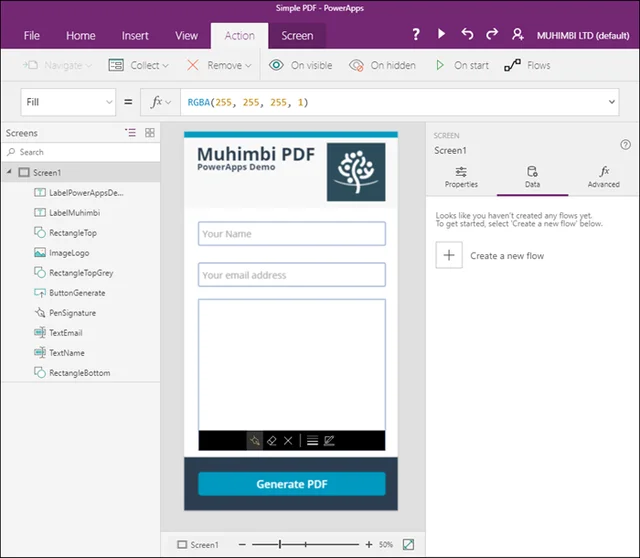
Let's begin by creating a PowerApp. It doesn't really matter what it looks like, as long as it contains two text fields named TextEmail and TextName as well as a button named ButtonGenerate. A stylised version of the form can be found in the screenshot below. Note that we also added a Pen Input field, which you may need in the Further Enhancements section.
With the form and various fields in place, create a new Flow using the Flows option in the Action ribbon. Click on the Create a new flow option in the right-hand side pane as per the screenshot above.
The Flow editor is opened and the PowerApps trigger is automatically inserted. Let's begin by giving the Flow a sensible name (the default is PowerApps button), instead name it PowerApps PDF Generator.
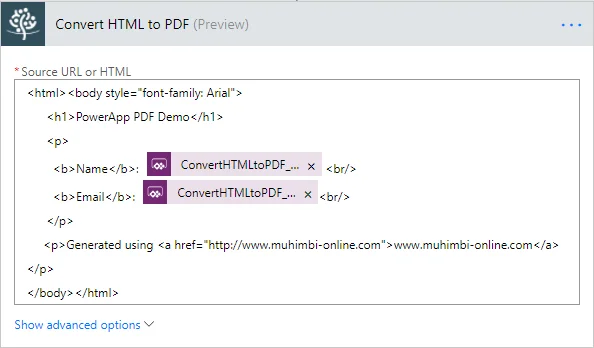
Click New step and select the Add an action option. Muhimbi's Flow actions are available out-of-the-box, there is nothing to install, just search for Muhimbi and select the Convert HTML to PDF option from the list. This action can convert URLs to PDF, but also has the option to convert HTML fragments, and... anything is possible in HTML.
If this is the first time you are using a Muhimbi action in Flow then you will be asked to specify your Muhimbi account. If you don't have one, click the Try for free button to create a new subscription.
The sky is the limit when it comes to HTML, but let's not go overboard for this simple example. Insert the following HTML in the Source URL or HTML field.
Now, this is where things get slightly tricky. We need to generate the parameters for the data we want to pass from the PowerApp to the Flow, in this case the contents of the TextEmail and TextName fields. To do this, position the cursor behind the semi column (:) after the Name label in the HTML fragment. With the cursor positioned, click the Ask in PowerApps option in the Parameters list, which will insert the incredibly undescriptive parameter named ConvertHTMLtoPDF_SourceURLorHTML.
In a similar fashion position the cursor behind the Email label in the HTML fragment, and click the Ask in PowerApps option again, which will insert and create the ConvertHTMLtoPDF_SourceURLorHTML_1 parameter, oh well, we can clean these names up after the Flow has been created and tested.
Depending on your exact use case, and number of variables that need passing between your PowerApp and Flow, you may want to generate the HTML inside the PowerApp, and pass it as a single parameter into the Flow.
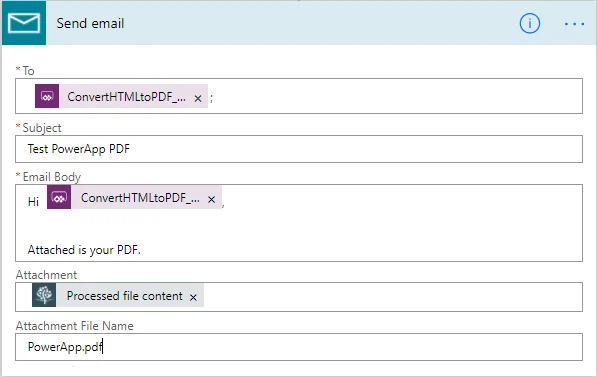
Add another step to process the generated PDF file. The file can be written to SharePoint, OneDrive, DropBox or any other Flow service that knows how to deal with files. In this example we will email the file as an attachment, so insert the Send email action of your choice (there are several services that can send email, we picked the one simply named Mail).
Remember how ConvertHTMLtoPDF_SourceURLorHTML_1 contains the email field? Insert that into the To field (or hardcode an address, it is up to you). Enter a descriptive Subject, Email Body and Attachment file name (under advanced options), make sure the file name ends in '.pdf'.
In the Attachment field, insert the Processed file content field from the Convert HTML to PDF action.
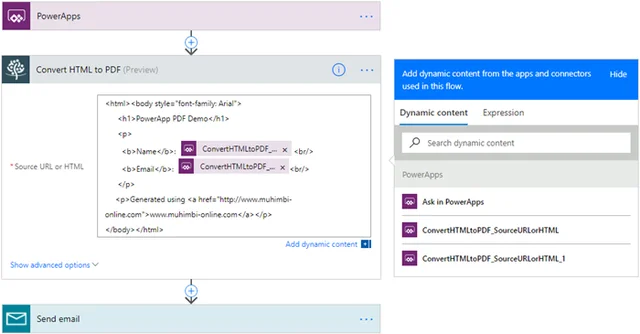
That is our Flow done, it is fairly simple as you can see in the screenshot below.
Save the Flow and return to the PowerApps editor.
With the Generate PDF button selected, select the Flow option in the Action ribbon. Select the newly authored Flow from the list. If you named it the same as we did ( PowerApps PDF generator) then a method name will automatically be generated and inserted in the button's OnSelect field. Please make sure the parameters for the name and email are passed in in this order.
PowerAppsPDFGenerator.Run(TextName.Text, TextEmail.Text)
That is it, save the form and preview the app (F5). Enter your name and email address, and click the button. After a few seconds you will receive an email with the PDF attachment in your inbox.
##Troubleshooting
PowerApps, Flow, a third-party PDF Converter, all excellent products but there are quite a few moving parts in this tutorial. It is not unlikely that you will experience a problem during the development.
End-user deployment limitations
There are some limitations when deployed to the end user. When a user tries to run the Power Apps application under his own account, Power Apps requests Muhimbi PDF authentication.
You have the following options to work around the problem:
- Use the Decoupled approach mentioned here
- Decouple the Flow from The Power App to prevent end-user Authentication Using a Child Flow (Learn more here)
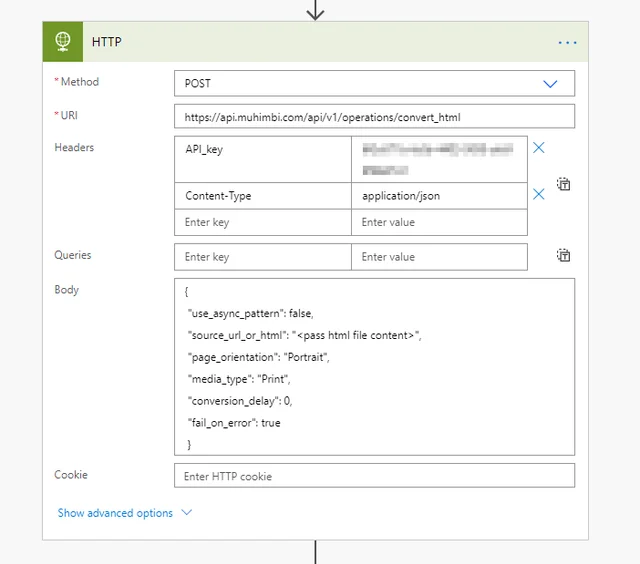
- Use the HTTP connector and query our action directly using our Muhimbi REST API.
If you do experience any other problems then please have a look at the following:
- Ask PowerApps: Please make sure that the number of parameters created by clicking Ask PowerApps matches the number of parameters passed to the Flow in the button's OnSelect event.
- Flow Name: Make sure the correct flow name is used in the button's OnSelect event. PowerApps will automatically generate the name, don't just copy the name from our example as it may differ slightly.
- Muhimbi account: The first time you interact with the Muhimbi Actions from Flow, you will be asked to login or create an account. If you organisation has a subscription, but you don't know the credentials, then please reach out to the appropriate team or create a new test account.
- Muhimbi support: If, after double checking all prerequisites and going over all troubleshooting steps in this section, you are stuck, please contact our friendly support desk, we are here to help.
Further enhancements
Although this is a nice and easy to follow, tutorial, we can think of a number of refinements and enhancements that will come in handy in the real world:
- Rename Ask PowerApps variables: The names of the parameters generated by Flow are undescriptive. You can actually fix this using the full Flow website (not the more limited version integrated in PowerApps). Export the Flow, unzip it on your local system, rename the variables in the included XML files to something more descriptive, zip the files again, upload the Flow and overwrite the existing one. Then refresh the Flow reference under the button. Telegram style instructions, but they worked for us.
- Generating HTML: In the real world it is likely that you have quite a few more parameters that your want to merge into the HTML. Passing them as individual parameters into the Flow is a bit painful, so consider creating the HTML fragment inside the PowerApp and pass it as a single parameter to the Flow.
- Insert Pen Input: Implementation of this is beyond the scope of this tutorial, but consider it an interesting exercise. It is not possible to easily pass the bitmap associated with the Pen Input to a flow. However, it is possible to create an Excel Data source in PowerApps and pass images to that data source. This should make it possible to query the location of the image using Flow, copy it to a location where it is accessible for anonymous users and include a reference to the image in the HTML. Easy?.... NO. Possible?..... Maybe. Use this as a starting point.
- Other output: Conversion is not limited to HTML, it is just a format that is easy for tutorials such as this one. The Muhimbi PDF Converter supports most common file formats, including Word XML.
What do you think, is this something that could work for your organisation? Feel free to leave a comment below or contact our support desk if you have any technical or commercial questions.
Labels: Articles, Flow, pdf, PDF Converter, PowerApps