

They say Great things come in small packages and Simple solutions are often the best. In case of our new, and completely free product, we humbly agree.
SharePoint Infuser’s concept is simple. It allows custom content, any content, to be inserted automatically on every page in a site collection. Big deal you may think, I can do that easily via SharePoint Designer / Customer Master Page / Content Editor Web Part, Delegate Controls etc. All I need to do is spec it out, develop it, put it through testing, put it past infrastructure, sweet talk the change control person and my manager…. Yes, easy indeed.
And indeed, some people may prefer to roll their own solution, which is not necessarily always a bad idea. Meanwhile the rest of us may want to make changes that can be measured in minutes rather than days, or more likely, weeks.
In essence Infuser is used in a similar manner to the many existing Content Editor Web Part (CEWP) ‘hacks’ such as Jan Tielens’ cool hacks, End User SharePoint’s many articles and ContentEditorWebPart.com. The main difference is that the CEWP must be added manually to every page in the site - which is a pain and doesn’t scale – whereas Infuser inserts the code automatically on every page in the Site Collection.
The best way to show the power of Infuser is by example. In addition to the examples listed below we will publish many more over the next few weeks, so subscribe to our RSS feed, Twitter Stream or Newsletter.
Example 1 – Hide unnecessary user interface elements
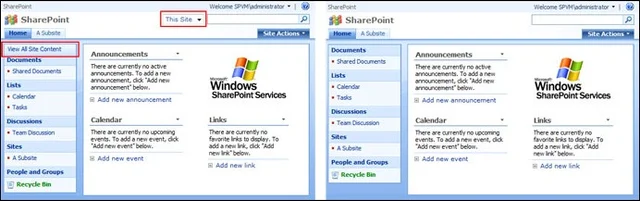
Sometimes less is better, which is why it may be a good idea to hide user interface elements that your users have no need for, or quite frankly would confuse them. In the following example we will hide the ‘View all Site Content’ and ‘Search Scope Picker’ from every page in the site collection as visualised in the following ‘before & after’ screenshots.
Follow the steps outlined below to implement the changes:
Download and install Muhimbi’s SharePoint Infuser on one of your Web Front End Servers.
Ensure you have Designer privileges, more specifically the Add and Customize Pages right.
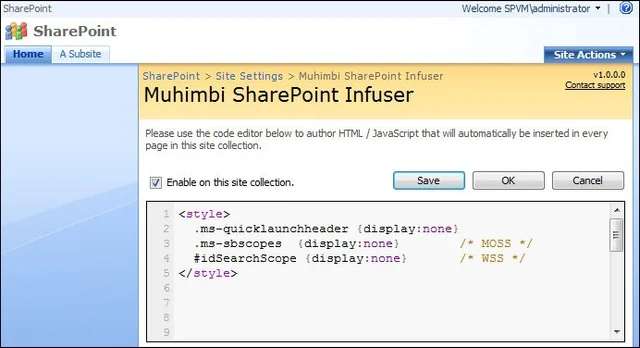
From the Site Actions / Site Settings screen, select Infuse custom content in the Look and Feel column.
Insert the following style sheets:
<style>
.ms-quicklaunchheader {display:none}
.ms-sbscopes {display:none} /* MOSS */
#idSearchScope {display:none} /* WSS */
</style>
Click the Save button and navigate to any page that was previously displaying the Search Scope Picker.
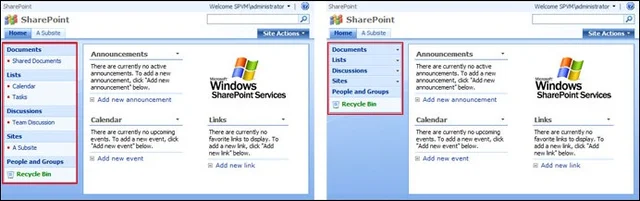
Example 2 – Collapse the Quick Launch menu
Let’s continue with a slightly more complex example that inserts a small section of JavaScript in every page in order to collapse the individual items in the Quick Launch Menu.
Follow the steps outlined below to implement the changes:
Download and install Muhimbi’s SharePoint Infuser on one of your Web Front End Servers.
Ensure you have Designer privileges, more specifically the Add and Customize Pages right.
From the Site Actions / Site Settings screen, select Infuse custom content in the Look and Feel column.
Copy and paste the code from this End User SharePoint posting.
Click the Save button and navigate to any page that displays the Quick Launch Menu.
Example 3 – Let it snow
Finally, and most importantly, a real Enterprise Ready example: Snow!…. Yes snow on every page of your SharePoint site, why not.
Follow the steps outlined below to add this marvellous winter wonderland.
Download and install Muhimbi’s SharePoint Infuser on one of your Web Front End Servers.
Ensure you have Designer privileges, more specifically the Add and Customize Pages right.
From the Site Actions / Site Settings screen, select Infuse custom content in the Look and Feel column.
Manually insert “<script></script>” in the Infuser window and paste the code in snowstorm.js in between.
Update line 75 (see how cool the line numbers in our editor are) to:
var imagePath = 'http://www.schillmania.com/projects/snowstorm/image/snow/';
Click the Save button and navigate to any page in the site collection.
Bonus Examples
We created a couple of follow up articles:
Automatically add ‘Search As You Type’ to every SharePoint page using Infuser
Fixing SharePoint’s Wiki by adding a home button and repairing the breadcrumb
How to Float the SharePoint Quick Launch menu with the location of the scroll bar
In closing
The possibilities are endless. If it can be done in the Content Editor WebPart then it can most likely be done more efficiently using SharePoint Infuser.
So, if your IT team doesn’t allow you to make changes, is too busy, your changes are not a priority or if you are hosting your SharePoint site externally and you are not allowed to install your own modifications then SharePoint Infuser is most likely the best option you have to modify the look and feel of your SharePoint site.
We are currently working with a number of hosting providers to ensure Infuser is installed by default on all systems, allowing all their customers to benefit from it.
Note that we ship with JQuery (1.3.2-min) out of the box. It can be found at “/_layouts/Muhimbi.Infuser/JQuery/jquery-1.3.2.min.js”
For more information check out the:
As always, feel free to contact us using Twitter, our Blog or regular email or subscribe to our newsletter.
Download your complete free, no strings attached, copy here (1MB).
You don’t even have to register, but we would appreciate it if you did.