
When I worked in the SharePoint team for a London based financial firm, one of the first user requests that came up was to find an easy way to synchronise team calendar entries with a department level calendar.
There are a number of ways to approach the automatic synchronisation of lists (a Calendar is just a SharePoint list). In this posting I will discuss how to synchronise any source list with a destination list, with the Exception of Document Libraries, using the Muhimbi Workflow Power Pack and a small script.
A quick introduction for those not familiar with the product: The Muhimbi Workflow Power Pack for SharePoint allows custom C# or VB.NET code to be embedded in SharePoint Designer Workflows without the need to resort to complex Visual Studio based workflows, the development of bespoke Workflow Activities or long development cycles.
Before developing the script we have to think about our approach as the synchronisation of list items involves both adding new items as well as updating existing ones. In order to be able to update an item we need to somehow track which item in the destination list is a copy of an item in the source list. As SharePoint does not provide an easy way to track this kind of information (The CopySource field is read only, sigh) the script will need to create a new and hidden field on the destination list to track an item’s origin.
The solution presented below allows any two lists to be synchronised in one direction (Source List to Destination List). The name of the Destination List is passed using Parameter 1. Only those fields available in both the source and destination lists will be copied over so there is no need for the two lists to have exactly the same content type. The very first time the script is executed, a new hidden field will be created on the Destination List, so make sure you execute the first run using an account that has the appropriate privileges to add columns to the list.
Create the workflow as follows:
Download and install the Muhimbi Workflow Power Pack for SharePoint.
Make sure you have the appropriate privileges to create workflows on a site collection.
Create a source and destination list, e.g. Calendar and Destination Calendar.
Create a new workflow using SharePoint Designer.
On the Workflow definition screen associate the workflow with the source list and tick the two automatic boxes and proceed to the next screen.
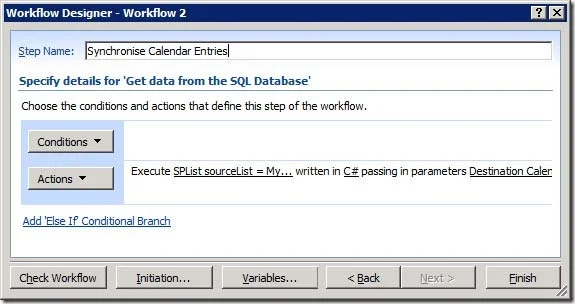
Click the Actions button and insert the Execute Custom Code action .
Click parameter 1 and enter the name of the Destination List.
Insert the following C# based code by clicking this code.
Close the Workflow Designer and add an item to the source list to trigger the workflow.
Once the workflow has finished, open the destination list and verify the source item has been copied over.

As mentioned previously, it should be possible to use this script on any list with the exception of Document Libraries. Synchronising Document Libraries can be done using a similar approach, but copying an item works slightly different.
The script in this post assumes the destination list lives in the same site as the source list. This, however, can be easily changed by referencing the desired list in line 2 of the code.
You may want to add a condition to only synchronise list items that match certain criteria (e.g. status = completed).