

Our popular PDF Converter for SharePoint has been able to convert InfoPath document to PDF format for quite some time and, even though we are continuously improving it with new functionality such as Dynamic View Selection and the ability to convert InfoPath attachments, you just can’t please everyone all the time.
For example, to achieve the best possible conversion fidelity our product requires InfoPath to be installed on the conversion server. This works great, but in some (mainly externally hosted) environments, this is not always possible. Fortunately the 4.0 version of the PDF Converter for SharePoint now comes with support for converting InfoPath forms to PDF format using InfoPath Forms Services, which is included with the Enterprise version of SharePoint 2007 & 2010.
Update (July 2013): We have noticed that some of our customers are under the impression that what is described in this blog post is the recommended way to convert Forms Services forms. That is not the case, the recommended way is to use our standard InfoPath converter to convert these kind of forms. The HTML Conversion option described in this blog post is merely a last resort if all other options fail. Please contact our support desk at support@muhimbi.com if you have any questions.
This can be very useful for some environments, but there are some limitations with this technique:
- InfoPath Forms services is required so it doesn’t run on the base WSS3 or SharePoint Foundation versions.
- It only works with Forms that are Browser enabled.
- Dynamic View Selection and conversion of Attachments features are not available, although it is possible to specify the name of the View to convert.
Our traditional approach that uses InfoPath on the server does not have these limitations.
 From Browser based form (left) to PDF Document (right). Click image to open the full PDF file.
Let’s show how to use Form Services in combination with the PDF Converter for SharePoint to convert InfoPath Documents. Some familiarity with both InfoPath and SharePoint is assumed. If you have any questions after reading this then leave a message in the comments section at the end of this post or contact us.
Make sure you have the appropriate privileges to create workflows on a site collection.
Start InfoPath, select Customize a Sample and double click on Sample – Expense Report.
From the File menu select Publish and go through the usual steps to publish the form to a new SharePoint Library named Expenses.
In the new Expenses document library, fill out a form and save it as Form1.xml.
Create a new workflow using SharePoint Designer.
On the Workflow definition screen associate the workflow with the new Expenses list, tick the boxes next to both ‘Automatically start….’ options and proceed to the next screen.
Add the Convert HTML to PDF action, click this url / html and enter the path to your site collection followed by Muhimbi’s InfoPathPrint.aspx page, e.g. http://moss/sites/Finance/_layouts/Muhimbi.PDFConverter/InfoPathPrint.aspx
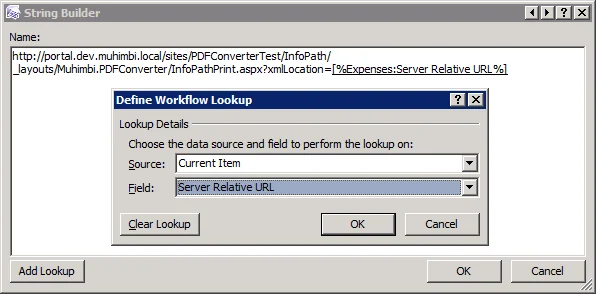
Don’t close the String Builder dialog yet. Add the xmlLocation querystring parameter, click the Add Lookup button and select the Server Relative URL field for the Current Item. The final result should look like the following screenshot.
Close the String Builder and click the this file option. Assuming we want to write the converted PDF file to the Shared Documents library enter Shared Documents/[%Expenses:Name%].pdf. (Insert the underlined text using the Lookup button. Just typing it in will not work).
Optionally change the orientation of the page to Landscape. There should be no need to specify the username and password as by default the credentials the Document Conversion Service runs under will be used for authentication with the aspx page.
Close the workflow to save and activate it.
Add a new form to, or update an existing one in, the Expenses library. After a few seconds the Workflow Status should change to Completed. Once complete the converted PDF document can be opened from the Shared Documents library.
If your InfoPath form contains multiple views then you can select which view to convert by concatenating &ViewName=your_view_name to the URL of InfoPathPrint.aspx.
In summary, if it is not possible to install InfoPath on the server in your environment, or if your forms look better in Forms Services compared to the full InfoPath client (it does happen), then use the technique described in this post to convert InfoPath documents to PDF format using InfoPath Forms Services.
As always, upgrades are completely free. Don’t hesitate to leave a comment below if you have any questions or contact us to discuss anything related to our products.
Labels: Articles, InfoPath, News, pdf, PDF Converter, PDF Converter Services, Workflow